Thursday 31 July 2014

The next step.

I was impressed when Curtis Buchanan showed me how to use a piece of string and elastic bands to find the drilling angle for stretchers into legs. Even more so when Pete Galbert introduced me to his technique of utilising a generic angle to do the same thing. Jeff Lefkowitz does neither, but instead utilises a technique more closely associated with staircase builders than chair makers, but it's effective and accurate. It's rise and run.

Essentially, instead of using a protractor or bevel gauge and angle finder to measure an angle at the intersection of two lines, rise and run is the process of measuring the rise or height of a line over a measured distance. Just the same as a staircase.

 But instead of calculating the height of the riser ( rise ) and the width of the tread ( run ) in the case of a set of stairs, the run is the distance between the two rungs, in vertical height and the rise is the difference in length between the two rungs - divided by two. It sounds a little confusing but is really quite simple.

Rise and run works well in relation to making a ladder back chair in the manner that Jeff and Brian make it. That is with predetermined stretcher lengths and spacings as opposed to stretchers that are measured after legs have been fitted to a seat, such as a Windsor. 

It's also a technique that Jeff has developed to be used in conjunction with a drill press, ensuring very accurate drilling. All in all I guess what I'm trying to say is, it works well, it's supremely accurate and it worked without issue on Tony and my chairs. I'm also trying to explain all of this in a manner in which I don't jump the gun on Jeff's own blog posts on the subject here - http://www.brianboggschairmakers.com/category/chairmakers_journal/ 

It won't be long until Jeff is posting about the above subject, with some great diagrams to assist. As with the other posts in Jeff's series on the ladder back chair, the post will explain the process in depth. 


Here are my front legs and back legs after drilling. Crisp accurate mortises.

Top of Tony's back leg

After the mortises in all legs were drilled it was time to shape the tops of the front and back legs. This is largely a personal touch and Tony and I spent a bit of time playing around with some different shapes before finally shaping the tops of our respective legs.


Legs shaped, it was time to glue up.  Well for Tony at least. My chair would have to wait, as it had to be packed into a cardboard box to get it home. Hide glue was used, Old Brown Glue to be precise. Jeff has also created a sliding carriage clamping jig to clamp all the parts together. Given the tolerance of the mortise and tenon joinery, the clamping jig ensured a controlled fitting of the two stretchers simultaneously making up the front panel of the chair.

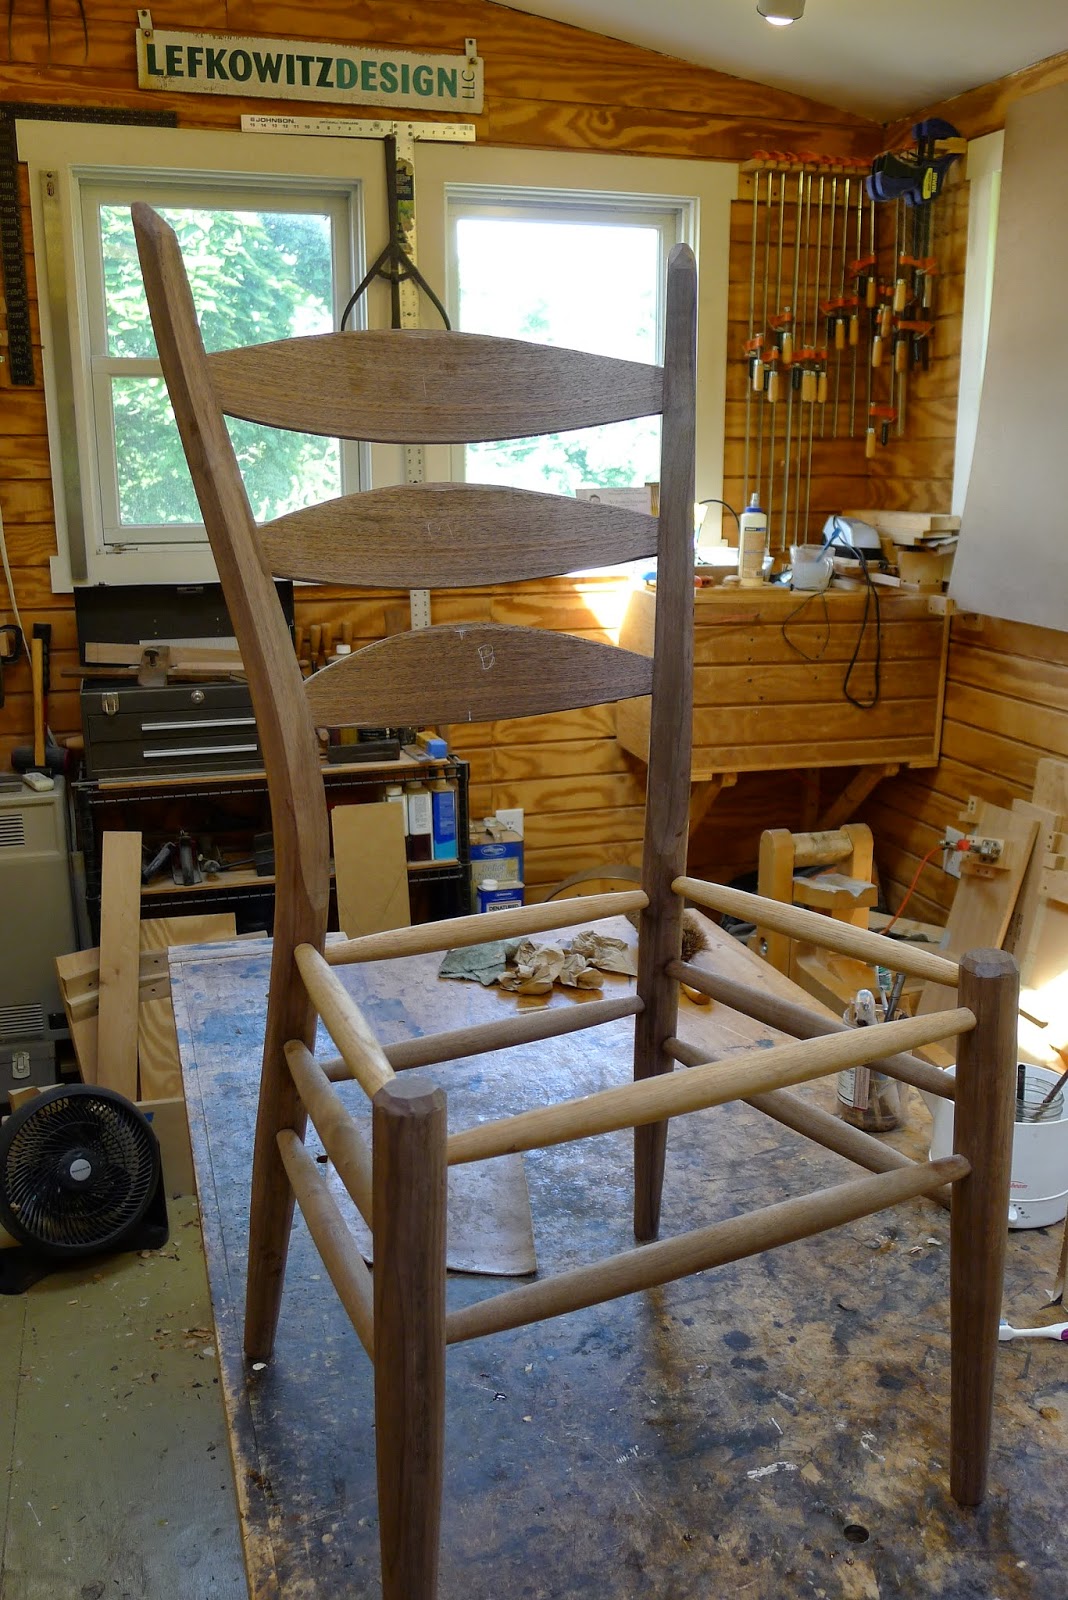
Tony's Walnut chair. Beautiful.

Next was the back panel, with it's 3 slats and 2 rungs. Seemless. Then the jig was finally used to assemble both front and back panels together, again without issue and in a very controlled manner. A quick check of the chair on the flat surface of the table saw revealed a perfectly stable chair, with no wracking. Next post the finishing touches and Hickory bark seat.

My Cherry chair, strapped in ready for the flight home.


Sunday 27 July 2014

“Take Me Out To The Ball Game”

I don't follow Aussie Rules and rarely stop to watch the cricket if it's on the idiot box. Suffice to say I'm no sports nut, but when Jeff and Tony suggested we go and watch a college ball game after a day in the workshop, the response was immediate - "I'm in." When in Rome as they say.


It wasn't like watching the Cubs at Wrigley Field ( thanks again, Dave and Stacy ) but it was great to get out and see some local entertainment over a concession stand hotdog or two! Tony and Jeff even ran me through the basics of the game…. possibly with the exception of the 'balk?' I saw it happen, but I still have no idea what happened? Great ball game though.

Saturday 26 July 2014

New lessons on an old chair.


A few Jeff made earlier….

On the first day at Jeff's workshop we were shown the various incarnations of a 'Boggs style' 3 rung ladder back chair. Prior to teaching the chair to others Jeff had taken numerous classes with Brian to learn how to make a variety of these chairs. From Greenwood versions to the complex rocking chair. Jeff stressed to us from the start that the class was not the same as taking a class with Brian. It soon became apparent why. 

After a short time leafing through the extensive manual provided by Jeff and looking over the array of well made jigs, it's evident that Jeff has analysed every part of the chair down to the last detail and set it out in a clear and comprehensive manner. Being a graphic artist by profession, Jeff's computer rendered manual is about the most analytical I've seen. It puts mine to shame, that's for sure.

Now I don't intend to go through every minute detail of making the chair as I don't think it would paint a realistic picture of the process. Instead I thought I'd provide an overview of the weeks class and a pic here and there. 


The first task was to prep the back legs for steam bending. We had that done and the parts in the steamer prior to lunch. These parts are thick and were in the steamer for about 2 hours. After lunch they were bent, as previously stated, in a very well made bending form and left for an hour or so before being moved to a drying form to set. This bending jig is a beast and really makes short work of bending a comparatively large section of wood. It's hard to see here but under the heavy black steel strap sits another stainless steel band to stop the wet wood reacting to the iron and leaving black marks.

 After this the back slats are bent too.

Cherry for me Walnut for Tony

As the legs take a few days to dry, and work needs to commence on those legs straight away,  Jeff had already prepped our respective legs days earlier and had them dried and ready for us. The legs and slats we bent would be used by a future student. Hope you like them whoever you are!? Legs are then further milled and tapered.


Day two consisted of mortising the tops of the legs , again with a well made and simple jig Jeff had devised. This went quickly and without issue. Slats were measured, marked out and the process of rough shaping and fitting them began. To say Jeff aims for a close fit is an understatement. No 16th's, 32 nds or millimetres here, its all about hundreds of thousands of an inch and to a tolerance of a couple hundreds of a thou.  Yep a bit of a side step from my usual method of shaving a spindle with a spokeshave until it fits in a hole in a block of wood! I can't say I raced through this, but the final fit was great. Tony certainly showed me how it was done here. 

just like red cars, shiny drawknives go faster….

That afternoon however we saddled up in the shave horse and rounded a 'practise' front leg from square to round. Same principle as spindles here and it felt good to be on the business end of a drawknife again. Jeff had one of Lie Nielsen's drawknives, which was a nice knife to use.....and shiny too.


Day three began with rounding and shaping all the legs front and back. Given that the back legs are no doubt a focal point on these chairs, a care is taken to mark them out and shave them very accurately throughout all the steps, square to octagon, tapering, then to 16 sides, etc etc.


Once the legs were rounded and scraped smooth it was rung mortising time. I found this part very interesting as it diverged from the process I was familiar with of finding the relationship of the stretcher to the leg and expressing it in degrees or the Galbert method of utilising a generic angle to both mark and drill the mortise. It's a great way of finding and expressing angles and works well utilising a drill press. But I want to do it justice in explaining it so please tune in for the next post.

Thursday 24 July 2014

The Where and The Why.

So after about 10 hours in the car I arrived just before dark at my next stop and the original reason for me coming to the States. To make a Brian Bogg's style 3 rung ladder back chair with Jeff Lefkowitz. Jeff has been teaching people how to make Brian's version of this iconic Appalachian chair for a number of years now and has made chairs with Brian, Pete Galbert and Curtis Buchanan in the past too. So his knowledge of chairmaking is quite broad.

Jeff  and his wife Cathy were also very kind in offering me a bed for the duration of the course which meant that travelling to the workshop of a morning was a short walk along a wooden boardwalk as opposed to a trip in a car. Jeff and Cathy have lived in their house on the outskirts of Strasburg, Virginia for over 30 years. It's set off the beaten track a little, on the side of a hill and surrounded by forrest on a couple of sides and farms on the others. 

Whitetail in the woods.

This young doe was and others like her, often with fawns at foot, were a common site. 

Tony left, Jeff right

Also on the course was Tony, from Great Barrington in Massachusetts, who had actually made a chair with Pete Galbert a week or so before I arrived in the States. Apparently Tony had found out about Pete after Jeff had told him that I was going to visit Pete when I arrived. It's great how these connections come about. After chatting for a day or so, I found Tony had a very similar eclectic range of careers like me, prior to getting involved with woodworking. And, after a few days with Tony in the workshop, it's obvious  he's made a good choice.

The first thing that is apparent when you walk into Jeff's shop is how well it's set out. Two rooms are connected by a large opening, with machinery in one and a bench and hand tools in the other. 


On the machinery side of things, there's pretty much everything you'd expect. Table saw, jointer/planer, thicknesser, mitre saw, drill press, bandsaw, lathe,  dust extraction etc etc. What is surprising is how well it all functions in the space it's contained in. It's done well.

Good low level chair makers bench.

The bench room is no different, a well thought out workbench with simple but effective wood racks on one wall, mass clamp storage through to sharpening stations and plenty of cupboard space. Handy rolling benches also offer good storage and effective clamping stations.


 Good food for thought in all of it.

The Beast in Question

Now about the chair. You might ask why a windsor chair maker would want to make a ladder back chair? No? Ok well I'm going to tell you anyway. Returning to the home of the chair I make reminds you instantly that Australia is not the ideal place to make American Windsors.

Our wood essentially just does not cut it. Before I get a barrage of emails telling me that I'm barking up the wrong tree ( pun intended ), let me expand on the last comment. 

We have timber that splits well and we also have timber that bends well, but a lot of those species, such as Blackwood, Mountain Ash, Celery Top Pine etc etc are not easy to come by, in that tall straight examples are generally locked up in National Parks or other areas that are no longer accessible. Other species that meet certain criteria well, often fail elsewhere, say by being too heavy. So that leaves bifurcated garden, paddock or street trees often as the only option. Not ideal chair wood. 

With 30" spindles this is not the sort of chair you want to make with short grain issues!

When you add into the equation the long lengths needed for parts like the crest rail for a Continuous Arm ( 1485mm/49-ish" ) or say spindles for a Comb Back arm ( 760mm/30" ) that's when problems arise. Even species like the Pin Oak ( Quercus Palustris ) which thankfully were planted in plentiful numbers, just aren't the same as the Red Oaks of the U.S.

Which brings me back to the 'why?'  I want to make traditional wooden chairs. Chairs with great joinery techniques, chairs without screws, nails or epoxy being the critical element holding them together. But having made Windsors for a few years now, chairs that are more suited to the timbers I have to work with. 

I've been making one of the more difficult traditional US Windsors for years now and dealt regularly with the limitations of our timber in making it well. The Continuous Arm for instance, is not the right chair for the place I live and work. 

Which is why when I return, I'll be offering Windsor chair courses and chairs that fit that criteria more closely. The ladderback is one of those chairs. No, it's not a Windsor, but 50mm/2" thick seat stock is also becoming difficult to source, so in a way it fits the bill even more so.

But it is also an exceptionally strong and well made chair, and the alterations Brian Boggs has made to the traditional design, mean that it is also exceptionally comfortable. It's not the end of me making and teaching the Continuous Arm Chair. It's just the beginning of making and teaching even better chairs. I hope you enjoy the journey.


Thursday 17 July 2014

See you soon


It had to end sooner or later, as most good things do.  And so last Sunday morning Pete and I jumped into his pickup and he dropped me up the road at the hire car place for the beginning of another leg of the journey. Back on the road again.

There's so much I could say about the past few weeks spent in the company of Peter, Claire and Charlie, but I'm intentionally going to keep it brief. 

People who know me well will also know my fondness for Winston Churchill quotes ( particularly the one about the occasion he was drunk and rebuked by Bessie Braddock, who in turn was told she was ugly....but I digress ) So Pete this ones for you. 

'Without tradition, art is a flock of sheep without a shepherd, Without innovation, it's a corpse.'  Winston Churchill.

 Your the innovator mate that will ensure the art of Windsor chair making lives on. Thanks.

Charlie and Claire and young woodworkers like them, are the future of woodworking in the U.S. and in my eyes it's in good hands. Their obvious thirst for knowledge, considerable talent and energy are inspiring.  Their sense of humour is infectious and woeful attempts at Aussie accents hilarious. You're in good hands too guys.


Sterling's loss is Asheville's gain.  I expect and hope it won't be too long until I see each of you again soon. 

Tuesday 15 July 2014

That's some House….


When I arrived at Pete's a few weeks back, we we sitting on the porch chatting ( possibly having a beer?  In fact a 'Lagunitas' -  'A Little Sumpin' Extra Ale,'  rated 5 Star by Ratebeer.com..... sorry, got a little sidetracked there ) when Pete mentioned that he was demonstrating at the Lie Nielsen Open House Event in Warren, Maine the following week. 

"Oh, that's awesome!"  I said.   I'd just tasted the beer...... Oh, really Lie Nielsen eh?   "Yes,"  said Pete, "and you should come along." And so after a lot more beer and a lot more days, I did.


 So with the pickup packed, we headed up the Highway for Maine. I don't know that I had any pre-conceived idea about what the Lie Nielsen workshops/factory might look like, but it was exactly what I had hoped it might. Very cool indeed.

It's a little odd to be at a show like this when your surrounded by the likes of persons you've previously only known via magazines and the internet. 
Taking a photo of Peter's axe was the only way I could see it not moving….

Highlights? The whole weekend. From Peter Follansbee carving spoons and bowls to meeting Mary May, hanging out with Charlie, Claire and Pete at their bench and us all having dinner together with the very cool Tico Vogt. 

Listening to Christian Becksvoort speak about his Shaker reproduction furniture and having an array of very nice Wetterlings Axes to play and chop out spoons with and meeting their CEO Julia Kalthoff.
 Having access to test drive every hand tool made by Lie Nielsen to meeting and speaking with Tom Lie Nielsen and Deneb Puchalski themselves. It was all great and very enlightening. 

That's 100% authentic Maine Seaweed steaming away…. 

Oh, and did I mention the Saturday afternoon? It's apparently a Maine tradition. A good 'ol fashioned  Losbster Bake, with corn on the cob, clams and hard boiled eggs ( oh, and more beer ). I'll let the pictures do the talking…..

 170 odd Maine Lobsters right there!

Now that's how to cook corn

  Ready…


And if that was not enough, we were treated to Peter Follansbee doing what he does best, inspiring us all, by talking about what he does. 


Magic stuff indeed. A big thank you to all who were demonstrating there, giving a little bit of themselves to make a great weekend for the rest of us. And particularly, thanks Mr. Lie Nielsen, it was quite a show. Cheers.

Jeepers.

 Seen whilst on the road. Makes you wonder what the drag coefficient is on a crucifix ?? 

Sweet rims, colour coded bumpers and tinted windows too….


Ahhh Brimfield


Just over an hour West of Boston is the smallish town of Brimfield. It's the usual quiet New England style of place, with a big white weatherboard church and the like....... except on the day Pete and I arrived. Where the place is transformed into the biggest antique market in the US, with over 5000 dealers spread over a mile and about 80 acres of field. And they run it 3 times a year.

I've been to a lot of garage sales, flea markets, car boot sales and antique fairs back home, but really, this was crazy. By the time we had walked around for a few hours and had to sit down to the best pulled pork roll I've ever eaten, I reckon we would have been lucky to have perhaps seen 5% of it. If that.

 It was insane. In fact I had sort of given up by then too. In the sense that the more cool stuff I saw the more it frustrated me that I was in no position to get it home! .... But here's a snapshot or two.

I can see me riding to work on this....


Or paddling down the Campaspe River in this.....


Yes this is really the only Harley Davidson I've ever really wanted....


Nice old tredleys, barn fresh as they say...…


Cast Iron Sir? How many ton would you like?


This guy had the pick of the tool selling tents we saw... and the highest prices too, but the range and quality were astonishing…. this was one of 3 isles.


By far one of the highlights and there were many, was this dovetailed chest with a coopered lid.


 As clearly painted on the front it was made around 1838, dovetailed, beautifully painted and had a handmade lock and key. Stunning piece.

So did I pick anything up? Silly question really.


Quite early on I saw this little 1880's Gerstendorfers Gold Paint container. On opening the lid the instructions, 2 piece paint brush and original bottle with golden contents sealed by a cork were all there. Snapped that up. 


Then there was an old 1940's Mallard decoy, which although not hand carved, has a great patina. 

An H.F Osborne round leather knife, HF was CS Osbornes brother, who CS bought out around 1905, which means that any HF Osborne tool has definitely had a long and interesting life.


A Barton Hoop driver for the bucket courses back home.... Get a load of that George!

Plus a couple of other bits and pieces. Moral to the story, if your in Massachusetts when this show is on, get yourself there and make sure you've had your vitamins for the day, it's incredible.