Saturday 31 October 2015

Tight fit.


After teaching a lot for the past month or so, it's been a true liberation to get back into the workshop and get a chance to make something myself. A chair of course.


The spindles should look like they have grown out of the seat.


The Crested Rocker from the previous post has been just the ticket too. A slightly more complex chair than the Fanbacks, Sackbacks and Continuous Arm Chairs I've been making of late. But this time around there has been a few factors that have made this a surprisingly quick build so far. 

One is that I've made a fair few of them now, so the joinery is more familiar. The second is that I have used air dried timber for the steam bends as opposed to the green or fresh Oak I would normally utilise.

This means that the bends set surprisingly quickly, have minimal spring back and virtually no shrinkage. It's a big time saver when a chair part doesn't have to spend days on end, drying in a heat box or kiln. Especially with parts the size of the stiles or back posts, which are 38mm ( 1 1/2 " ) octagons . That's a large part to dry when its green.


Lastly I used a little jig that I recently built a dozen of, for a Barstool class. Quite simply it locates an indicator pin in the correct plane to sight off for drilling stretcher mortises. The jig is usually attached to the leg, but in this case I used it to align the drilling angle of the stepped mortise into the stile from the arm post. I've always found drilling this mortise to be trickiest part of making the chair. This is due to the drilling angle being acute to the seat and on a curved chair part. But the angle jig made the process a no brainer. Every angle that needed to be known or referenced was right there on the little pin.


 The resulting joint was the best I've done on a chair of this kind, full stop.

So Friday I fitted the spindles to both the seat and crest, turned the stretchers, roughed out the rockers and carved the seat. I mentioned in the last post that I was careful to choose 1/4 sawn Elm for this chair. 

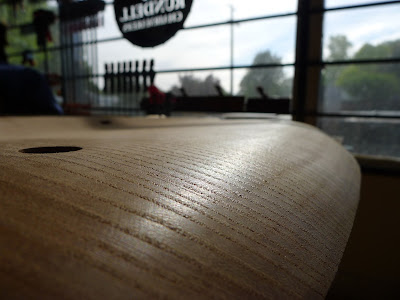
Rift or back sawn Elm, although visually stunning as a finished seat, can often be a real pain to carve. The porosity of the radial growth rings is the issue here. When shaved or scraped at the slight angles found at the front of most Windsor chair seats, the wide cross sections of porous growth rings can fracture and crumble, making final smoothing problematic. In difference, shaving those same ring porous growth rings on their edge results in a clean, firm surface without those issues.


 I think the photo above speaks for itself. The front edge of the seat was spokeshaved across its width and scraped briefly. A light sand with 240 paper and final scraping will reveal a beautiful finished seat, after the entire chair is assembled.

Yesterday we had the pleasure of Master Cooper George Smithwick's company in the workshop, to teach the Coopered Wooden Bucket Class. The four students kept up the tradition of travelling to the workshop from far and wide. Ray travelled from Thalloo in Central Gippsland, Rosemary, from Waubra, half way between Ballarat and Avoca, Nick from Melbourne and Drew from Bendigo. I'm very fortunate to have a workshop that people gravitate to, to take part in these classes. As the saying goes, love what you do and you'll never work a day in your life.


The day went as smooth as silk and thanks to George's great teaching skills and the great work of the students, we kept our 100% success rate of no leaking buckets too. Nice work. Our tradition of filling the new buckets with water and holding them over the makers head, may have contributed to their determination to make one that didn't leak….


I'm pretty happy to be planning out the remainder of the year. Aside from another 3 classes, I'm planning to bring the sawmill up to Pineville to mill an ever increasing pile of logs in the paddock. That should yield some spectacular Redwood, Yellow Pine, Hoop Pine and Blackwood. And if I'm lucky, perhaps an Osage Orange log to mill also..... stay tuned. 


Wednesday 28 October 2015

Where we left off…….

I wouldn't know where to begin if I tried to recap the last 10 months or so since my last post here. There's been another Lost Trades Fair, a bunch of classes, a few chairs here and there and lots of progression on the house. In fact for those who are unaware we have been living in Pineville since early March.


Verandah made a huge difference.

I'll be the first to admit that the infamous Instagram has been the reason for the non existent action here, but love it or hate it ( and to be honest I'm indifferent about it now ) it's an easy and relatively quick way to convey pictures. But there's a whole range of associated baggage that comes with it. A lot of that is beyond your control, it's not an option. And that I'm afraid is why I jumped ship. Sure I'll throw a pic or two on there some time in the future, but it does not allow me to convey the information I like and the reality is you end up devoting a lot more time to it than you first might think. 

So rather than a blow by blow account since January, I'll jump straight into what's happening in the workshop now. The other pieces should fall into place as we go. 


These guys ( and 20 of their mates ) visit every morning outside the kitchen window.


View from the deck outside the kitchen

With Spring almost fully sprung, the light in the morning at home and in the workshop, is casting a slightly different shadow. In a few days Summer will be upon us and no doubt just as I've longed for the weather to be a little warmer of late, I'll be pining for the cold before long too.


New cupboard and drawer carcasses behind one of the 3 new benches.

The workshop will look a little different than the last time it was shown here. We have slowly but surely been building new benches, shave horses and installing new cupboards too. So while the shell of the old place is just the same, it's certainly getting more user friendly inside. It all points towards the space being more effective for my use, but also being more versatile for the range of other classes we run there, such as the Coopered Wooden Bucket Class this Saturday.

The cupboard carcasses went in a few months ago. They were an essential part of the process of organising this space. A lot of stuff, tools included had been 'floor hung' prior to that and we were getting to the point of critical mass! But they won't look like this forever. In the coming months the intention is to make solid Blackwood panelled doors and drawer fronts for the lot. This should keep things dust free and also add a little character to the not so pretty white melamine.


On the bench at the moment I have a Crested Rocker in progress. I've put about 2 full days into it so far, milling, bending parts and doing the initial joinery. The upper and under carriage is Pin Oak 
( Quercus Palustrus ) and the seat locally grown English Elm ( Ulmus Procera ).
I have previously tried to use one piece Elm seats for these big rocking chairs, but this time I've book matched a stunning piece of quarter sawn Elm for the piece. 


The colour variation in this flitch was stunning as was the radial growth ring pattern. It will be a much more beautiful seat when carved than say a rift or back sawn single piece seat.

As with the majority of my rocking chair commissions, this one is heading to Melbourne for an expectant new mum. There's no doubt when making rocking chairs for new Mums ( or Dads ) that you know your chair will be fully appreciated and loved. Especially at 3am feeding times!


Cracked crest and missing spindle.

There's been a familiar presence in the workshop for some time too that will be heading back home next week. This old American balloon back Windsor was bought in for a repair about........ well lets just say a long time ago. But the owner did say she wasn't in any hurry! It was bought home from the States and during the trip was successfully crushed by the shipping company, smashing the crest rail in 3 places, destroying one of the spindles and splitting another. Now normally I run a mile from any chair repair, quite honestly because 99% were not made properly in the first place and..... well they aren't Windsor chairs. But this was and so I agreed to fix it. 

There were a few differences in this chair to the chairs I make. Mostly to do with the spindles. My chairs have riven spindles shaped by hand with drawknife and spokeshave at the shavehorse. They are fitted straight into a matching sized stopped mortise in the seat. Usually 12mm ( just under 1/2" ). This old girl has turned spindles with 'nodes' in two places. The spindles are also shouldered at the seat, with that shoulder being pared parallel to the seat. Interesting stuff and a level of joinery that I wouldn't necessarily say was common in chairs of this age. ( might be wrong? ) It had a whole lifetime and then some, of layers of paint all over it. For sure there was green, white and possibly even cream under the black. Not nice, thin layers of milk paint either. Heavy, thick and no doubt lead based stuff here and so thick that most the detail, such as the beading on the steam bent bow was almost invisible.


Got to love hide glue. New turned spindle wedged in place.

A new spindle was turned from dead straight and dry Beech with a stepped tenon at its base. It was a stretch ( literally ) to prize the crest open enough to slip the new spindle into the old mortise through the crest, but it seated beautifully and a wedge was driven in to finish the job. A trim and shave and three coats of Black milk paint made it look the part, but the finishing touch was a brush coat of button shellac, which matched the original muddy black of the spindles around it. 


All done

It will be sad to see it go as I've pondered the shape and geometry of that chair often, but I've also traced a few patterns off it too, so it may appear in another guise soon.


With another two chair orders literally coming in last night it promises to be a busy time leading to Xmas. We have a Perch, Fanback side chair and Shaker Oval Box Classes in there too. Then there's a bit of stuff around the house to talk about also. It's good to be back.