In my last post I said it was nice carving spoons by the fire. Well things are getting colder by the minute in Kyneton and last night I just didn't get enough done at the workshop. So the fireplace in the shop was just crying out to be used and what better use than making chairs?
Couldn't resist taking a photo. Well how often do you get to drag the shavehorse inside in front of the fire? I'm tipping it won't happen too often, but I got the spindles fitted to the Fan Back and all in front of the roaring fire. I love winter!
Wednesday, 6 June 2012
The lovin' spoonful
I'm grateful to be able to say that I was too young to experience The Lovin' Spoonful's music. Great name though and I've been having another spoon experience of late.
A fella in Tennessee told me a few years ago that when he tired of making chairs that he was going to carve wooden spoons. I'm sure when Curtis does, they'll be about the best spoons going around
Pete Galbert carves them regularly as well and says that if you want to learn about working wood - carve spoons. In fact he showed me how to select the right part of the trunk and branch to make graceful spoons with flowing, curved, continuous grain. Have a look a Pete's spoons on his blog, they are spectacular.
And lastly, I've been admiring the spoons and courses run by Drew Langsner for years. Just a bit far to travel to make a spoon.
But the other day I found myself down at the farm with a bit of time up my sleeve and staring at a very scrubby looking wattle tree. No good for chairs, but being scrub like means lots of branches and branches mean spoons.
I didn't have much in the way of tools, just a carpenters axe and my trustee pocket knife. At first I took the top of the branch down to reduce the weight below, so the blank I wanted wouldn't split or tear.
While I was cutting the branch off I noticed just how how rigid the remaining branch and trunk were. So being in the field, without a workbench or clamps I thought why not let the tree be the clamp for me. So with the bit I wanted still attached firmly to the trunk, I just hewed away as much as I could with the little axe ( albeit, the absolute worst type of hatchet for the job at hand ).
But wrong axe or not, it worked a treat and I found that I could really chop out the rough shape with relative ease and without trying to either balance it on a chopping block or clamp something uneven to a bench.
There's a bit of work to go and I'm not happy with the handle, but as pretty much my first serious crack at spoon carving, I'm pretty pleased. And it's a nice thing to do by the fire at night too.
A fella in Tennessee told me a few years ago that when he tired of making chairs that he was going to carve wooden spoons. I'm sure when Curtis does, they'll be about the best spoons going around
Pete Galbert carves them regularly as well and says that if you want to learn about working wood - carve spoons. In fact he showed me how to select the right part of the trunk and branch to make graceful spoons with flowing, curved, continuous grain. Have a look a Pete's spoons on his blog, they are spectacular.
And lastly, I've been admiring the spoons and courses run by Drew Langsner for years. Just a bit far to travel to make a spoon.
I didn't have much in the way of tools, just a carpenters axe and my trustee pocket knife. At first I took the top of the branch down to reduce the weight below, so the blank I wanted wouldn't split or tear.
While I was cutting the branch off I noticed just how how rigid the remaining branch and trunk were. So being in the field, without a workbench or clamps I thought why not let the tree be the clamp for me. So with the bit I wanted still attached firmly to the trunk, I just hewed away as much as I could with the little axe ( albeit, the absolute worst type of hatchet for the job at hand ).
But wrong axe or not, it worked a treat and I found that I could really chop out the rough shape with relative ease and without trying to either balance it on a chopping block or clamp something uneven to a bench.
There's a bit of work to go and I'm not happy with the handle, but as pretty much my first serious crack at spoon carving, I'm pretty pleased. And it's a nice thing to do by the fire at night too.
Thursday, 31 May 2012
Good Life Festival - Share
This Saturday the 2nd, The Good Life Festival will be held at the Daylesford Primary School Hall. There will be a fantastic, eclectic variety of stall holders demonstrating everything from hand made boot making to keeping chooks, bees and even worms! Oh and not to forget yours truly chatting about chair making and doing the odd demonstration or two. On Sunday at the Daylesford Town Hall the festival will focus on sustainable building techniques and living. Here's the link for more info.
http://share.asn.au/good-life-festival-2012/
It's sure to be a great weekend with plenty of information on healthy living and tips on enjoying what Hepburn and Macedon Ranges regions have to offer. Most importantly how to do it all whilst being mindful of our greatest asset of all, our environment.
So if you have a spare day on Saturday or Sunday, why not take the drive to Daylesford and spend some time in the country doing what a lot of us up here are doing most days. Living the good life.
http://share.asn.au/good-life-festival-2012/
It's sure to be a great weekend with plenty of information on healthy living and tips on enjoying what Hepburn and Macedon Ranges regions have to offer. Most importantly how to do it all whilst being mindful of our greatest asset of all, our environment.
So if you have a spare day on Saturday or Sunday, why not take the drive to Daylesford and spend some time in the country doing what a lot of us up here are doing most days. Living the good life.
Tuesday, 29 May 2012
A brush with fame
Amongst the pace of the previous week I had a visit from a friend with a very interesting piece of cargo on board. We both agreed that given the objects value, we would not advertise who owns it. You know, like the dentist, who's face they couldn't show on T.V....... ( it's an Australian thing, to my overseas friends! )
A James Krenov hand plane, made by Mr. Krenov himself some thirty odd years ago. In conjunction with the hand plane was a signed letter and copy of a Krenov book and a photo of Krenov signing the very same book! The closest I had previously ever come to anything 'Krenov' was at the Appalachian State University in North Carolina a few years back, watching Krenov protege, David Finck making a Krenov style hand plane during a workshop on the subject. Finck signed a copy of his book for me, but the plane he made was whisked away and not for sale. Bummer.
It was amazing to hold and inspect a hand tool made by a true woodworking icon. The plane was superb in its earthy simplicity and felt like it was an extension of my arm when holding it. But turning it over to inspect the sole, it was apparent just how finely made an instrument I was holding.
The mouth was as crisp and fine as I've ever seen ( The original Swedish blade is retracted in this photo ) and the insert fitted in front of the mouth was seamless.
It was a real treat to see and hold a real piece of woodworking history. Thank you very much for the experience.
A James Krenov hand plane, made by Mr. Krenov himself some thirty odd years ago. In conjunction with the hand plane was a signed letter and copy of a Krenov book and a photo of Krenov signing the very same book! The closest I had previously ever come to anything 'Krenov' was at the Appalachian State University in North Carolina a few years back, watching Krenov protege, David Finck making a Krenov style hand plane during a workshop on the subject. Finck signed a copy of his book for me, but the plane he made was whisked away and not for sale. Bummer.
It was amazing to hold and inspect a hand tool made by a true woodworking icon. The plane was superb in its earthy simplicity and felt like it was an extension of my arm when holding it. But turning it over to inspect the sole, it was apparent just how finely made an instrument I was holding.
The mouth was as crisp and fine as I've ever seen ( The original Swedish blade is retracted in this photo ) and the insert fitted in front of the mouth was seamless.
It was a real treat to see and hold a real piece of woodworking history. Thank you very much for the experience.
Monday, 28 May 2012
The busy season
There is a distinct feeling in the air around the town at the moment. The days are getting shorter as we race towards winter solstice. The sun no longer streams through the workshop roller door as it sits lower in the sky to the North. The smell of open fires is heavy in the evening air and the smoke can be seen quietly rising from chimneys up and down Piper Street. Every one seems to be moving with a bit more pace and deliberation, preparing for the winter ahead. Sort of like squirrels running around preparing for hibernation.
And similarly the pace has not slowed for our household. We are now in our own space and rental properties are again a thing of the past. But the special part about own new home is that it also has our new business attached to the front.
And here it is. What was until recently a lovely little restaurant, will be the future shop front for our business, Rundell & Rundell. I loved the way this late night shot of the shop looked like an old sepia photo, not withstanding my ute in front!
I actually met a fella today who told me the building was once a meeting place for the local town militia / regiment, who used to gather on the front verandah. I'm looking forward to finding out more about that in the future. The interior, although full of tables and chairs from the restaurant at the moment, is thankfully just the right blend of blank canvas and period building that we were looking for. It also has three open fireplaces in the shop, great for all those chair offcuts and rivings!
In fact the last few nights we have enjoyed dinner around the table, right here with the open fire roaring in the background. Magic. One of those nights we shared the table and a few local ciders with friends Erin and Tim who were in town to start their chair making odyssey.
Both chose vastly different but equally special blanks for their seats. Tim, a piece of my air dried Elm, from a tree I milled which once grew in South Yarra's Fawkner Park. Erin a piece off the end of a single board of birds eye Macrocarpa I just bought from a local saw miller a few days earlier. Both will make truly eye catching stools.
The guys only had a limited time in the workshop and so will come back to assemble and add the finishing touches to their perches. I'll be sure to post some pics of the finished pieces as they will have another pretty special component to them which should set them apart from the crowd. Fitting material indeed, as it was a pleasure to have them both here for the weekend. Cheers guys.
Thursday, 24 May 2012
Going with the grain
There has been a lack of posting here as the past few weeks have been busy around the workshop.
Bec a Kyneton local, came to make a birthday present for her husband Simon's birthday. A birthday which has not come around yet so I can't show too much of what she made ( or say too much ) but suffice to say part of it was the most spectacular piece of Huon Pine I've seen in a long time. I've had the Huon sitting around for a long while now, and this was the ideal project for a slice off the end.
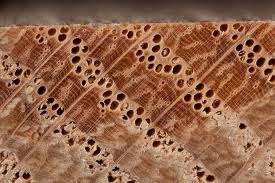
On average Huon Pine trees grow 1mm per year, but as you can see with this pic of the end grain, there are areas where there must be two or three ( or more ) growth rings per mm. Yep, that's one old tree.
And here is Bec putting the finishing touches to that piece of Huon, with 'said item' seriously cropped from the image! The finished product was brilliant and it was great couple of days. When the birthday boy gets his present I'll post some more pics.
Then this week I had Soren from Melbourne come up to make a Perch. I met Soren while demonstrating at the Wood Steam and Steel Festival in Wandin a few months back and it was good to see him arrive with his tools ready to go. With a good few years of turning experience behind him, short work was made of the Pin Oak legs and stretchers and they came up a treat.
After lunch we started with the seat, and had the whole lot drilled reamed and ready for carving the next morning.
And that's when another beautiful grain pattern showed itself. No, they aren't a quarter of a millimetre thick but what a great symmetrical seat. You couldn't have drawn it better!
And here is Soren paring the wedges and legs flush. Given Soren's height, we added a good 34mm
( 1 1/4" ) to the legs to put the seat at exactly the right height. That's another very enjoyable aspect of making chairs by hand, being able to truly make a bespoke piece of furniture, tailored to the individual.
I was pleased that he also decided to take my advice and paint his perch with milk paint. Originally we were going to do the whole thing, but with that grain in the seat, Soren decided to oil that and paint the Pin Oak legs with Barn Red.
Here's Soren's Perch with the first coat of oil on the seat and milk paint on the legs. I'm looking forward to seeing the legs with a few more coats of barn red and a top coat of oil or two. Great result Soren.
But that's not where the grain runs out, as this weekend I have Erin and Tim arriving to make two more perches, again with different timbers and maybe different finishes too. Looking forward to seeing what that grain has in stall for us too.
Bec a Kyneton local, came to make a birthday present for her husband Simon's birthday. A birthday which has not come around yet so I can't show too much of what she made ( or say too much ) but suffice to say part of it was the most spectacular piece of Huon Pine I've seen in a long time. I've had the Huon sitting around for a long while now, and this was the ideal project for a slice off the end.
On average Huon Pine trees grow 1mm per year, but as you can see with this pic of the end grain, there are areas where there must be two or three ( or more ) growth rings per mm. Yep, that's one old tree.
And here is Bec putting the finishing touches to that piece of Huon, with 'said item' seriously cropped from the image! The finished product was brilliant and it was great couple of days. When the birthday boy gets his present I'll post some more pics.
Then this week I had Soren from Melbourne come up to make a Perch. I met Soren while demonstrating at the Wood Steam and Steel Festival in Wandin a few months back and it was good to see him arrive with his tools ready to go. With a good few years of turning experience behind him, short work was made of the Pin Oak legs and stretchers and they came up a treat.
After lunch we started with the seat, and had the whole lot drilled reamed and ready for carving the next morning.
And that's when another beautiful grain pattern showed itself. No, they aren't a quarter of a millimetre thick but what a great symmetrical seat. You couldn't have drawn it better!
And here is Soren paring the wedges and legs flush. Given Soren's height, we added a good 34mm
( 1 1/4" ) to the legs to put the seat at exactly the right height. That's another very enjoyable aspect of making chairs by hand, being able to truly make a bespoke piece of furniture, tailored to the individual.
I was pleased that he also decided to take my advice and paint his perch with milk paint. Originally we were going to do the whole thing, but with that grain in the seat, Soren decided to oil that and paint the Pin Oak legs with Barn Red.
Here's Soren's Perch with the first coat of oil on the seat and milk paint on the legs. I'm looking forward to seeing the legs with a few more coats of barn red and a top coat of oil or two. Great result Soren.
But that's not where the grain runs out, as this weekend I have Erin and Tim arriving to make two more perches, again with different timbers and maybe different finishes too. Looking forward to seeing what that grain has in stall for us too.
Friday, 11 May 2012
A step closer
As the cold weather begins to set in, up here in the central highlands I can see what the locals ( I was told recently that I won't be a local until my Grandmother is buried here- that may be a little hard now ) mean when they say "the weather is turning." And with that onset of cold wind and colder nights it's obvious just how important keeping warm is.
For this reason Lisa and I have been stuffing every last square inch of the cottage with insulation. When we first stripped back the old layers of this house, there was not a single batt, piece of sisalation or anything else for that matter, between the outside wall layer and the internal plaster. I don't know how anyone kept warm in there.
It's Autumn and we have already had several frosts, so winter should be a doozy. So with every part of the frame jammed with insulation we have hung the plaster ( with Dad's help too ) and will finish off the wall linings with solid lining boards in the main living area. This has really put some definition back into what was the skeleton of the frame.
And today a little more progress was had with a past chair making student and friend Peter Page coming up with his brickies tools and re-facing the chimney in the living area. Peter did a great job and the fireplace now looks a treat. I forgot the camera today though so there will be some photos to come. Another step closer to the little place being finished. Thanks Pete!
Thursday, 26 April 2012
Connectivity
The past few weeks have been an interesting time from a chair making perspective. Two separate tree species that I have been experimenting with as chair timbers have both rewarded me with exceptional results which I previously believed, or was led to believe we could not achieve with native species here in Southern Australia.
Red Oak End Grain
In the U.S. particularly with red and white oak, chair parts are easily riven to close tolerances with wedges and froe without issue. Similarly when shaving the same parts with the drawknife, the same qualities that ensure even and straight splitting, then clearly define runs of grain, both in the radial and tangental planes, that make dimensioning spindles and the like a breeze. Now while there is not an Australian timber that I know of that has the same ring porous qualities as American Oak, I figured that if I focused instead on the other factors that make timber split well, then surely I would give myself the best possible chance of success. To tick as many boxes as possible, so to speak.
I had been focussing on a trip to East Gippsland where I know of a particularly good stand of straight, Narrow Leaf Peppermint ( Eucalyptus Radiata ) which I wanted to experiment with, when I received a phone call from a friend, Pete McCurly.
Pete is well known amongst Australia's musical instrument makers as a source for highly figured native timbers, namely our sought after desert species such as Ringed Gidgee and Coobah. You can reach Pete on 0438 082 984, if you are chasing that extra special flitch or slice of wood. Above is a piece of his Ringed Gidgee ( Acacia family - there's lots of 'em.) I put into a mirror for a friend. It's pretty awesome stuff. Pete was in the process of working amongst a nice stand of Blackwood ( Acacia Melanoxylon ) and rang to tell me that there were some smaller trees among them that may be of interest.
The following day I found myself standing in front of a Blackwood log in the middle of swamp out the back of Daylesford. The tree, which was really on it's last legs, had a central heart, first tick. It was not figured, which meant the grain ran straight, as opposed to say 'fiddleback/curly' grain, where the grain can go in all manner of directions, second tick. From a quick assessment of the bark, there was no visible twist to the trees trunk, or 'wind' that I could see, meaning that the wood should by all accounts want to split reasonably straight, third tick. The fourth? Well I've seen enough colonial chairs made of Blackwood over the years to know that there was some reason as to why those clever old chair and furniture makers used it for chairs. Strength and workability being the first things that come to mind. I had actually started making Windsors here with some Blackwood parts, but the Blackwood that was sourced for me for the job was wrong from the outset and it never lived up to it's potential.
The other factors that would assist me would be following accepted principals of splitting timber evenly. So with the log docked to just over 1600mm ( over 5' ) I grabbed the wedges and sledge hammer and had at it. First split in half was promising. There was a slight wavering half way down, but I split it again in half to see if it worked it's way out. It did and so with that I took the long piece and put it into the 'break' to see if I could split it with the froe, evenly again and closer to the 30+mm thickness I needed for a Continuous Arm blank.
One minute later I had the two pieces in front of me, the wave or shake had disappeared and I was left with two fine blanks, ready for the shave horse. I showed Pete, who I think was equally as impressed. I've been splitting off spindles and crests now for over a week, pretty much when ever I walk past, as I just can't help myself.
The spindles shave beautifully as they are a perfect run of straight grain, one end to the other. And the large wedge left on the side was perfectly split on the quarter, so that will be a fan back crest for a chair that I have on order.
The first crest I shaped in the horse, steam bent about as easily as I have experienced. Here it is out of the kiln today, nicely set and ready for a little cleaning up before being put into another Blackwood chair I'm making.
I've been teaching and making Windsors for a few years now, but it always felt like I was 'cheating' to a degree, by bandsawing chair parts. Leg stock is one thing, as there is not the same strength issues as with a finely shaved spindle, so sawing is not really an issue. But there is nothing like watching the parts split off with the froe, especially in the radial plane where with the Blackwood, they literally 'pop' apart. It's almost a sense of coming full circle with my connectivity to my chosen trade, like the missing piece has been found and put squarely into place. That can only be a good thing.
Saturday, 21 April 2012
A different view.
It's not a baluster leg or a steam bent crest but I couldn't resist taking a few photos of our future home's garden. These little guys are about as sweet a tomato as I've ever tasted.
Artichoke
In amongst renovating the cottage we had been going through the motions with our local council about building a new shop and residence here in Piper Street. The amazing plans which my Uncle Geoff had drawn had been shown to a few builders too and the resounding responses were estimates and timelines that would choke a chook and curl your toes.... both at the same time. So some serious rethinking was in order. Around the time of us contemplating our respective navels, a little place just two doors down happened to become available. Star Anise restaurant.
So the plans are on hold just for the moment and the future home of Rundell & Rundell is assured. There's a pretty overwhelming sense of excitement in the household at the moment, with plans of the shop setup coursing though our minds. Stay tuned for more on that soon, but when looking out the back at the organic garden that supplied this Chef's Hat awarded restaurant, I couldn't resist getting the camera out and capturing the amazing fruit and vegetables growing there.
Tomatoes galore, so many that you could make pasta sauce for a month. Black currents, Tahitian limes, lemons. Artichokes, pumpkins and peas. Mint, rosemary, thyme... the list goes on. So it looks like we will be well catered for when we move in. A great resource too for lunches for people coming to take a chair course here.
And the view across the fence isn't bad either. It sort of reminds me of the little towns and villages we stayed in on our trip to England and Scotland last year, deciduous trees and stone buildings. We've got a great feeling about the place already are counting the days now until we can make it our own.
Monday, 16 April 2012
Something about cake.....
I really meant to post about the first chair class I've run in Kyneton earlier than this, but moving house sort of got in the way. Then a nasty bug decided he would take up residence in my stomach for bit and see if he could cause a little bit of unrest. Well mission accomplished bug, nice work.
Anyway, back to that happy day, being last Friday, when my first clients finished their two Continuous Arm Windsors. And what a great pair of chairs they were. Both Mark and Tony were suitably impressed with the finished product and well they should be, they both turned out a great chair. I was glad they chose to have baluster turnings in the chairs too. I don't know, maybe it's because the first Windsor I made had balusters, but I really feel the Continuous Arm shines with that extra detail that the balusters afford over the Bamboo/Double Bobbin.
There was a third fella who was just as happy as the guys and that fella was me. There was a good deal of satisfaction had in the knowledge that this chair making stuff had merit!
Seeing the course come to fruition over the last week was very satisfying indeed. The week flowed very nicely too and I was able to tweak and structure the days to suit the guys as their progress unfolded.
The result was a very laid back last day, with no pressure, no hurried work or mistakes and both chairs being finished and spindle tips trimmed in time for a celebratory beer or three afterwards. Tom bought around his box bacon flavoured Cheesels too, as you can see in the background.
The icing on the cake was both Tony and Mark discussing throughout the week, building their own shave horses and their plans for making more chairs in the future. That was always a big part in my interest in teaching others to make chairs. Inspiring people to continue to make chairs and windsor style seating after taking a class with me. To have it happen already assures me it was the right choice, kind of like having the cake and eating it too.
Anyway, back to that happy day, being last Friday, when my first clients finished their two Continuous Arm Windsors. And what a great pair of chairs they were. Both Mark and Tony were suitably impressed with the finished product and well they should be, they both turned out a great chair. I was glad they chose to have baluster turnings in the chairs too. I don't know, maybe it's because the first Windsor I made had balusters, but I really feel the Continuous Arm shines with that extra detail that the balusters afford over the Bamboo/Double Bobbin.
There was a third fella who was just as happy as the guys and that fella was me. There was a good deal of satisfaction had in the knowledge that this chair making stuff had merit!
Seeing the course come to fruition over the last week was very satisfying indeed. The week flowed very nicely too and I was able to tweak and structure the days to suit the guys as their progress unfolded.
The result was a very laid back last day, with no pressure, no hurried work or mistakes and both chairs being finished and spindle tips trimmed in time for a celebratory beer or three afterwards. Tom bought around his box bacon flavoured Cheesels too, as you can see in the background.
The icing on the cake was both Tony and Mark discussing throughout the week, building their own shave horses and their plans for making more chairs in the future. That was always a big part in my interest in teaching others to make chairs. Inspiring people to continue to make chairs and windsor style seating after taking a class with me. To have it happen already assures me it was the right choice, kind of like having the cake and eating it too.
Saturday, 7 April 2012
Quality
In 2009 when I travelled to Tennessee to learn how to make windsor chairs with Curtis Buchanan, I recall being excited just at the prospect of learning how to make a chair. I had travelled a long way to do so, sold my beloved motorbike to finance the trip and left my wife and then 2 year old boy behind at home to find what I hoped to be a new future for us.
In a way I didn't have any expectations of how the course should be, look or pan out. I was just as excited about the experience, as having a chair at the end.
You could probably imagine how the excitement grew when I first laid eyes on Curtis' workshop tucked away next to the organic raspberry patch at the bottom of his garden. The next week was the greatest learning experience of my time to that date. Thankfully I've had another since with Pete in Massachusetts in his original 1790's chair makers house.
So what made both classes special? Quality. When I say that, I mean not only the level of expertise of both my teachers. But the materials provided, tools used and definitely the depth of the experience had whilst learning. The experience itself is as important as the final product, being the chair. The purpose built workshop in Tennessee overlooking the valley of Jonesborough or Pete's workshop looking out to the ruins of the Rocky Brook Chair makers workshop across the way, both were inspirational places to experience making windsor chairs
Today when I began to teach my first Windsor Chair making class here in Kyneton with Mark and Tony from Melbourne, I knew that I wanted them to be just as inspired as I was ...... and still am! I also know that they should expect to have as close to my U.S. experiences as I can provide and so that is just what I have set out to achieve.
Crisp Maple baluster turnings. U.S. Yellow Pine seat blanks and best yet, green spindle and crest rail stock which has been split straight from the log. In fact the 5 foot long crests that I split out of the log a few days back for the class were as close to the white oak ones from Tennessee as I could hope for.
Here's a snap of one of the splits about half way through. I finished with six good crests out of the quarter of the log that I split.
These are the two crests from the split above. Beautiful, split straight grain. I'm almost tempted to do away with the strap to bend them!
And here are the guys on the horses, shaving spindles in the fresh country air and warm Autumn sun under the skillion of the workshop. No, it's not an 18th century chair makers workshop, but it's as close as you can get here without jumping a plane half way round the globe. Before the next class at the end of the month, the rest of the fruit trees and the veggie gardens will be planted and the cottage in the background should be a good deal further along too. A quality view to finish the package.
In a way I didn't have any expectations of how the course should be, look or pan out. I was just as excited about the experience, as having a chair at the end.
You could probably imagine how the excitement grew when I first laid eyes on Curtis' workshop tucked away next to the organic raspberry patch at the bottom of his garden. The next week was the greatest learning experience of my time to that date. Thankfully I've had another since with Pete in Massachusetts in his original 1790's chair makers house.
So what made both classes special? Quality. When I say that, I mean not only the level of expertise of both my teachers. But the materials provided, tools used and definitely the depth of the experience had whilst learning. The experience itself is as important as the final product, being the chair. The purpose built workshop in Tennessee overlooking the valley of Jonesborough or Pete's workshop looking out to the ruins of the Rocky Brook Chair makers workshop across the way, both were inspirational places to experience making windsor chairs
Today when I began to teach my first Windsor Chair making class here in Kyneton with Mark and Tony from Melbourne, I knew that I wanted them to be just as inspired as I was ...... and still am! I also know that they should expect to have as close to my U.S. experiences as I can provide and so that is just what I have set out to achieve.
Crisp Maple baluster turnings. U.S. Yellow Pine seat blanks and best yet, green spindle and crest rail stock which has been split straight from the log. In fact the 5 foot long crests that I split out of the log a few days back for the class were as close to the white oak ones from Tennessee as I could hope for.
Here's a snap of one of the splits about half way through. I finished with six good crests out of the quarter of the log that I split.
These are the two crests from the split above. Beautiful, split straight grain. I'm almost tempted to do away with the strap to bend them!
And here are the guys on the horses, shaving spindles in the fresh country air and warm Autumn sun under the skillion of the workshop. No, it's not an 18th century chair makers workshop, but it's as close as you can get here without jumping a plane half way round the globe. Before the next class at the end of the month, the rest of the fruit trees and the veggie gardens will be planted and the cottage in the background should be a good deal further along too. A quality view to finish the package.
Wednesday, 4 April 2012
A Sterling Rocker
Going through my photos last night in preparation for the class this weekend I came across some photos of a rocking chair that I had seen in the Sterling Historical Society House in Massachusetts. The curator of the Society had heard that Pete Galbert had moved into Newton Burpee's original chair makers house and had approached Pete while I was there and offered for us to come by and be shown their collection of chairs.
It was an amazing collection of chairs all made by local chair makers stretching back to the late 1700's, ( there were apparently nearly 40 chair makers in that little region alone ) including a couple of original Burpee chairs too. But in amongst it all was something that I had never seen in person.
This little rocking chair. Interesting design and some very finely applied line details too. But the one hint that all was not as it seemed was the secondary round mortise hole just right of the left arm stump. Surely a chair maker of this calibre wouldn't be that far out with his drilling, or send out a chair with a big hole in the seat.
But 30 seconds later all became apparent as the curator had 'transformed' it into this, a rocking babies cradle. Very impressive. Quite simply the right side of the chair extended out from a sliding rabbet joint. The crest rail then lifted out and was fitted into two round tapered mortises, including the strange hole in the seat, becoming the front 'fence.' Don't know if this would pass government safety tests these days. You might have more of your baby out of the thing than in it!
It was a very cleverly thought out piece with all of his joins hidden amongst gouged details in the seat or turning details in the stiles. Above all else though, would have been the time and effort that would have gone into making such a piece as opposed to a standard rocker. A chair like this would surely have been a special order as making pieces like this regularly would not have been economical. It was a great thing to see and all of these chairs were good food for thought in firming up my design for a new chair. More on that soon.
Mont De Lancey - Part 2
The weekend before last Lisa, Tom and I packed up the car and my ute with half the workshop and made the journey across to Mont De Lancey in Wandin for the Wood Steel and Steam Festival. It was a great little country style fair, with steam engines chugging away all day, the sound of Blacksmiths hammering at the anvil and brilliant wood turners demonstrating their skills at the lathe. In amongst it I set up my bench and shavehorse and talked all things Windsor until I was blue in the face.
Also on board was Dad with his Timberking Sawmill, which drew a huge crowd every time he fired it up. He milled a stack of logs for some of the locals.
There was face painting for the kids, great food and coffee and of course the spectacular Mont De Lancey homestead and out buildings too, which is just like the original owners walked out the door over a hundred years ago. Read about it here - http://www.montdelancey.org.au/
We had some great feedback over the course of the weekend and Tom entertained as only he knows how, sitting confidently at the shavehorse and wielding a spokeshave like it grew out of his arm! He even had a good little dialogue going, describing how the spokeshave was cutting his spindle. He's got a bit of size to him, so a few people were very surprised when they learnt he was only 4. With a couple of courses booked and an order for a chair, perhaps I'll put him on the payroll!
Since returning from the U.S. last year I've been trying to get a copy of Pete Galbert's chair makers adze made up by a blacksmith, as I don't have a forge of my own. I'd contacted a few smiths but had trouble even getting a response half the time. I had an old rabbit trap setter, which was the ideal blank. With this in hand, I took it over to Dietmar Fleckhammer ( great blacksmiths name hey? ) in the blacksmiths shop, with some scale patterns I took while in Pete's workshop. No problem said Dietmar and before I knew it he was back with the modified setter now in the form of a adze.
Brilliant. Over the course of the weekend Dietmar also whipped up a couple of sets of hold downs too, again in the blink of an eye.
We couldn't help ourselves and end up buying a set of his fireplace tools too, knowing that the little house we are about to move into, has open fires. Deitmar is a very skilled and competent Blacksmith and has his shop set up at Mont De Lancey. It's well worth a visit.
Keep an eye out for the Festival next year, it's a great weekend and good to support the small groups and communities that run them. I often get asked how to sharpen edge tools with curved blades so next entry I'll be showing how I sharpened and turned and fitted a handle to the adze.
Monday, 26 March 2012
Windsors around the world
There's been a lot of movement around the station the last few weeks and this past one has been no exception. Work on the cottage, demonstrating chair making at The Wood Steel and Steam Festival at Mont De Lancey, preparing for an up coming double chair course and working on some new chair designs in between!
Then late last week, at the same time as collecting Mr Goostrays tool chest and tools, I collected the box containing the Crested Rocker I made with Pete in Massachusetts last year.
Here it is being taken out of the box it's lived in for over 4 months. Millie watched on with interest. This is hopefully the only time I will ever flat pack one of my chairs!

And here it is dry fitted, it was great to see it again after it's long journey from Sterling MA, half way around the world.
While the balloon backs are a little on the heavy side for my liking, I was interested to see the resemblance of the end chair to our 'Kangaroo Chairs' here in Australia. Being the most well known 'windsor style' chair in Australia, these were made in droves with decorated crests. The very first of these were carved, with everything from native flora to kangaroos and emus. In later years these decorations were pressed into the crests as the chairs became mass produced.
By far the most famous Windsor chair maker in Australia's history has to be George Peddle of Tasmania. A Peddle chair is now quite the collectors item and worth quite a good deal of money too.
Peddle's chairs were made usually of blackwood, with square-ish seat shapes, turned legs with multiple beads and a shaped crest rail. Very much like the chair sitting at the end of this table in Warwick. Which is not surprising given that Mr. Peddle was from the heart of Windsor chair making in the UK, High Wycombe...... just an hour away from where Leigh took the photo. Great stuff. Thanks Leigh.
Wednesday, 21 March 2012
Cottage Update....
Here you can see the new roof that Jim Carew ( the Master Plumber I did my apprenticeship with ) his son Brendan and I put on a few weeks back. Traditional galvanised iron, with returned spouting and return stop ends, which will turn a dull gunmetal grey with age. Also the new verandah and divided windows.
And a view of the new back of the house with the french doors and deck. We look forward to spending a few relaxing afternoons here in the sun in the coming months. Then in the future, this will be a B & B for those attending my Windsor chair making classes in historic Kyneton. I think it will be a reflection of the ethos of our business, the products we intend to make and sell and the classes we will teach. It's taking time, but all good things do.
Subscribe to:
Posts (Atom)