
Tuesday, 27 September 2011
The Old Chest.....
Just thought I'd add this little teaser. The old chest I've spoken about before. Well it seems it's taking on a life of it's own. I've always known it's origins and how important I thought it was, both to me and to the City of Melbourne, but now it seems a few others are starting to think the same thing. More on that in the next couple of days.... Stay tuned.


Continuous Learning Chair
So the time has come around again for our Continuous Arm Windsor Chair Class at the Melbourne Guild of Fine Wood Working. Alastair and I have been teaching this class for a few years now and have put an enormous amount of preparation and time into it, but what never ceases to amaze me and impress, is when a student comes up with something else to improve the process.
We have had people from all walks of life come and make chairs with us. Teachers, solicitors, dentists, and carpenters, vets and Doctors, and even a few other furniture makers looking for a change in pace and its that sort of cross section of the community that brings fresh ideas and approaches to the chair making process.
Some of the ideas are interesting and others so simplistic in their answer to the problem at hand that you wonder how you could have possibly not thought of them beforehand. Today for example there was a 2 minute adjustment to a drilling jig that made sighting and alignment a breeze. Followed by a suggestion on how a small change to our 6 degree reamer could almost eliminate the need for sighting lazers.

I guess sometimes you cant see the wood for the trees ( or chair legs ), but it's this continuous improvement and working out solutions to make us better at our craft that I enjoy about chair making and wood working in general. Add to that, sharing of ideas and advice and it makes for a happy experience all round.
So with that thought in mind it's my turn. Now this isn't ground breaking stuff by any stretch. But when it comes to solving a small problem that always seemed to catch out at least one or two students every class, this one is a simplistic beauty.
After drilling the mortises in the legs of windsor chairs the side and centre stretchers need to be measured, insitu, including the exact distance into both leg mortices. Now while this is not brain surgery it does require accuracy and measuring a distance between two internal surfaces and if to be really accurate, inside the mortices of those internal surfaces. So that rules out ( excuse the pun ) tapes, most rulers and even the wooden fold out rulers with the slide out extensions.
Previously we had used a couple of steel rulers, one large and the other a small 6" steel rule that would fit into one mortice hole. Then there would be some adding of measurements plus the extra mortice that the large ruler didn't fit into etc etc. Suffice to say there wasn't a simple solution. By the time that final measurement was transferred to the stretcher there was usually one or two mistakes, usually in the addition phase and the stretchers were cut too short. End result, wasted stretchers, new stretchers to be turned and plenty of time wasted. So...

Bar head gauges. Made by Veritas they are a simple brass and plastic fitting that you add some fine timber beams to, to make a sort of adjustable 'story stick.' I think they are made mainly for checking the square-ness of drawers etc. But for our purposes I make the beams so that they are about 40mm longer when fully extended than the usual length of a stretcher. The ends are then tapered to slightly less than 5/8", the standard mortice size. I then measure the exact overall measurement of the gauge when closed. I then mark on the face of the gauge 'mm' increments starting with the closed measurement. So in this case starting at 280mm and through to 410mm.
To use it, simply loosen the knurled brass locking nut, extend the gauge into the mortices on both legs until they bottom out. Then just read the accurate measurement on the gauge. Better still, if the gauge does not rotate smoothly inside each mortice hole then it means that your legs are not located in their correct alignment. When the legs are adjusted the gauge will rotate smoothly and you've got guaranteed aligned legs too. We haven't lost a stretcher since and they are 'mm' perfect.
Provided you've marked the increments accurately on the gauge you now have an accurate measurement gauge, no adding, no more balancing two rules and a nice tool to add to your chair making kit too! Make the beams out of something nice too. There's a bit of birds-eye maple in this one. I'll post a photo of them in use when we use them this Thursday. Cheers.
We have had people from all walks of life come and make chairs with us. Teachers, solicitors, dentists, and carpenters, vets and Doctors, and even a few other furniture makers looking for a change in pace and its that sort of cross section of the community that brings fresh ideas and approaches to the chair making process.
Some of the ideas are interesting and others so simplistic in their answer to the problem at hand that you wonder how you could have possibly not thought of them beforehand. Today for example there was a 2 minute adjustment to a drilling jig that made sighting and alignment a breeze. Followed by a suggestion on how a small change to our 6 degree reamer could almost eliminate the need for sighting lazers.

I guess sometimes you cant see the wood for the trees ( or chair legs ), but it's this continuous improvement and working out solutions to make us better at our craft that I enjoy about chair making and wood working in general. Add to that, sharing of ideas and advice and it makes for a happy experience all round.
So with that thought in mind it's my turn. Now this isn't ground breaking stuff by any stretch. But when it comes to solving a small problem that always seemed to catch out at least one or two students every class, this one is a simplistic beauty.
After drilling the mortises in the legs of windsor chairs the side and centre stretchers need to be measured, insitu, including the exact distance into both leg mortices. Now while this is not brain surgery it does require accuracy and measuring a distance between two internal surfaces and if to be really accurate, inside the mortices of those internal surfaces. So that rules out ( excuse the pun ) tapes, most rulers and even the wooden fold out rulers with the slide out extensions.
Previously we had used a couple of steel rulers, one large and the other a small 6" steel rule that would fit into one mortice hole. Then there would be some adding of measurements plus the extra mortice that the large ruler didn't fit into etc etc. Suffice to say there wasn't a simple solution. By the time that final measurement was transferred to the stretcher there was usually one or two mistakes, usually in the addition phase and the stretchers were cut too short. End result, wasted stretchers, new stretchers to be turned and plenty of time wasted. So...

Bar head gauges. Made by Veritas they are a simple brass and plastic fitting that you add some fine timber beams to, to make a sort of adjustable 'story stick.' I think they are made mainly for checking the square-ness of drawers etc. But for our purposes I make the beams so that they are about 40mm longer when fully extended than the usual length of a stretcher. The ends are then tapered to slightly less than 5/8", the standard mortice size. I then measure the exact overall measurement of the gauge when closed. I then mark on the face of the gauge 'mm' increments starting with the closed measurement. So in this case starting at 280mm and through to 410mm.
To use it, simply loosen the knurled brass locking nut, extend the gauge into the mortices on both legs until they bottom out. Then just read the accurate measurement on the gauge. Better still, if the gauge does not rotate smoothly inside each mortice hole then it means that your legs are not located in their correct alignment. When the legs are adjusted the gauge will rotate smoothly and you've got guaranteed aligned legs too. We haven't lost a stretcher since and they are 'mm' perfect.
Provided you've marked the increments accurately on the gauge you now have an accurate measurement gauge, no adding, no more balancing two rules and a nice tool to add to your chair making kit too! Make the beams out of something nice too. There's a bit of birds-eye maple in this one. I'll post a photo of them in use when we use them this Thursday. Cheers.
Tuesday, 2 August 2011
Time flies...
Well the heading says it all, but supposedly when your having fun. I don't know how much fun it was moving a large house full of 'stuff' and ten years worth of workshop setup, machinery and stock, but suffice to say we are here now in Kyneton and starting to put our roots down for what we hope will be the next very exciting stage of our lives in the country.

But regardless of our plans for the future, the most important aspect is front and centre above......no, not the cross and no, I haven't become a born again something or other, it's the little man looking out over the War Memorial on Mt. Macedon and the Macedon Ranges.
So apologies to all of you who have been looking at this blog and wondering why there was a distinct lack of action, it's certainly taken up more of my time than I had ever expected, but now that for the most part, the worst of it is over, I can get back to some semblance of wood working. Only thing is that I will be renting space in a friends workshop until I get something sorted here in town, so projects may take a little longer than they previously did.
Anyway the chest didn't get a chance to be finished pre-move, but it is high on the list of work to be completed. I'll get onto that soon as the next chair course is looming fast.

But regardless of our plans for the future, the most important aspect is front and centre above......no, not the cross and no, I haven't become a born again something or other, it's the little man looking out over the War Memorial on Mt. Macedon and the Macedon Ranges.
So apologies to all of you who have been looking at this blog and wondering why there was a distinct lack of action, it's certainly taken up more of my time than I had ever expected, but now that for the most part, the worst of it is over, I can get back to some semblance of wood working. Only thing is that I will be renting space in a friends workshop until I get something sorted here in town, so projects may take a little longer than they previously did.
Anyway the chest didn't get a chance to be finished pre-move, but it is high on the list of work to be completed. I'll get onto that soon as the next chair course is looming fast.
Saturday, 18 June 2011
Dovetailing zen
It's been a while again since my last post and I've been busy with all sorts of things, but in amongst it was a little dovetailing. Whilst marking out the first few drawers it dawned upon me, what was I thinking posting about how to dovetail when there's been more articles in more books and magazines than you could poke a very large stick at and by better 'dovetailers' than me. So I just got on with it and cut them when I got a spare moment in the madness. I quite like dovetailing and find it very relaxing, no machines, just a saw, chisel and mallet.
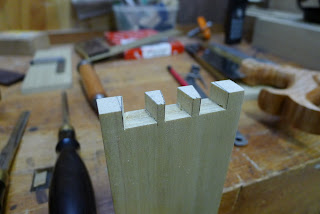
So anyway here's one of the backs, sawn and ready for marking a side, just to prove that I did cut them by hand and here's the next photo of it dry fitted.
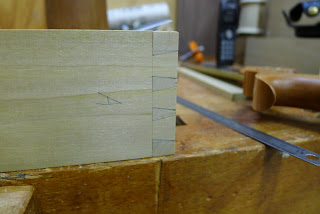 Not perfect I know but they are supposed to be for a utilitarian drawer. I made the drawer backs a little thicker than the sides as the old drawer backs from the antique chests are quite thin and some of them have split.
Anyway they are all cut and half of them glued, now just to mill some solid drawer bottoms. For those I'm using some very old recycled old growth Kauri Pine boards. They came off my 1930's Delta pattern makers lathe that I bought from a pattern makers workshop in Ballarat that had closed down. After the bottoms are fitted I'll finish plane the drawers individually to fit the till. Then turn some drawer pulls and fit them too. I really want to get cracking now and finish this thing as I want to have it done for my move to the country in 20 days!! Don't like my chances...but there's no harm in trying.

So anyway here's one of the backs, sawn and ready for marking a side, just to prove that I did cut them by hand and here's the next photo of it dry fitted.

Anyway they are all cut and half of them glued, now just to mill some solid drawer bottoms. For those I'm using some very old recycled old growth Kauri Pine boards. They came off my 1930's Delta pattern makers lathe that I bought from a pattern makers workshop in Ballarat that had closed down. After the bottoms are fitted I'll finish plane the drawers individually to fit the till. Then turn some drawer pulls and fit them too. I really want to get cracking now and finish this thing as I want to have it done for my move to the country in 20 days!! Don't like my chances...but there's no harm in trying.
Monday, 23 May 2011
A new beginning.
So you might have picked up from my last post that our house was on the market. Well it finally sold on the weekend. Now we can focus on our move to the country. When we originally thought of doing so, it was with a view of a small land holding where we could all spread ourselves out, big farm house, plenty of water, fruit trees, veggie garden, chooks, various other stock and a ridiculously big workshop! So we've bought a block half the size of our current block in the main street of Kyneton. Crazy? We hope not, there's method in the madness but more on that later....
 I thought I had listed pretty much every wood I could think of in my rack to make my drawer fronts from. What did I choose? Something else of course, Black Heart Sassafras. Pretty much my favorite Australian timber. In fact anyone who's been to my house will attest to that, nearly every piece of furniture I've made for it, built in and free standing has been from Sassafras. I love the stuff. Goes very well colour wise with the Poplar too. Here's all the fronts stacked up.

Here is a small sample of one corner. These pieces were all off cuts from the same table I've mentioned previously. I probably spent a good hour arranging the pieces and trying to match the grain, colours and flow so it appears that they have all come from one very large board. I've got it close, as close as I can using scraps. This is straight from the jointer, so it's a bit rough but the photos ( & fluro lights ) don't do the grain and colour justice. Should be nice when french polished. Here's a few more Sass. pieces from around the house..


Little hall table with book matched top, made for my wife Lisa....

Built in hall cupboard. Combined project made by Ian Rasmussen and myself. Ian built the carcasses and paneled doors, we both put it together/installed it and I made the 10 dovetailed drawers with Messmate Burl drawer fronts. Ian is a brilliant furniture maker, wine maker and jeweler each of which he accomplishes with amazing accuracy, skill and attention to detail. He also is my source of all of the Sassafras I've ever used, all of which came from far East Gippsland, where it can no longer be sourced.
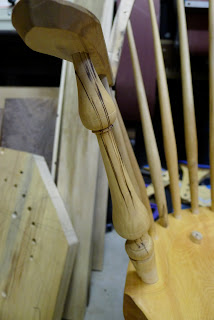
Last but not least a baluster style arm, in spalted Sassafras, on a Sassafras and Huon Pine chair I'm working on. Next blog I'll be going through the process I follow in making and fitting a hand cut dovetailed drawer, as shown to me by a bloke who's a bit of a master at it!


Here is a small sample of one corner. These pieces were all off cuts from the same table I've mentioned previously. I probably spent a good hour arranging the pieces and trying to match the grain, colours and flow so it appears that they have all come from one very large board. I've got it close, as close as I can using scraps. This is straight from the jointer, so it's a bit rough but the photos ( & fluro lights ) don't do the grain and colour justice. Should be nice when french polished. Here's a few more Sass. pieces from around the house..


Little hall table with book matched top, made for my wife Lisa....

Built in hall cupboard. Combined project made by Ian Rasmussen and myself. Ian built the carcasses and paneled doors, we both put it together/installed it and I made the 10 dovetailed drawers with Messmate Burl drawer fronts. Ian is a brilliant furniture maker, wine maker and jeweler each of which he accomplishes with amazing accuracy, skill and attention to detail. He also is my source of all of the Sassafras I've ever used, all of which came from far East Gippsland, where it can no longer be sourced.

Last but not least a baluster style arm, in spalted Sassafras, on a Sassafras and Huon Pine chair I'm working on. Next blog I'll be going through the process I follow in making and fitting a hand cut dovetailed drawer, as shown to me by a bloke who's a bit of a master at it!
Sunday, 15 May 2011
Fill the till
So here is the the till in bits ready for gluing. Back panel has been checked for size and room to expand and contract with the elements.

All glued together I pre- finished the inside of the till with a few light coats of shellac to give a stable base for wax later on, to make the drawers glide in and out with ease. I intend to have a fair few tools in each drawer, so every bit of sliding assistance helps! I then grabbed my trusty wooden clamp and glued in the bottom drawer divider before the center divider was fitted. Some people ask why I bother to make these types of clamps, well the answer is in this photo. What other clamp is there that will provide good clamping pressure this far ( approx. 180mm/or over 7"s ) from an edge, with still over 25mm (1") to spare? I don't use it all the time, but it's invaluable when I do. The jaws are made of Cooba, a native Australian Acacia with beautiful figure.

Here's the till all glued up, dividers in place and ready for for finish planing, a light sand here and there and then a few coats of tung oil. Quite happy with how it looks, plane as it is. Maybe I can put a bit of colour in the drawer fronts?

Hopefully I'll get a chance to start the drawers this week, but our house goes to auction this weekend so I may get a little distracted with other things! I'll stick with poplar for the drawer sides and bottoms but don't know about the fronts. Looking through the wood rack, I've got a choice of ...... salvaged Tasmanian Myrtle, salvaged fiddleback Redgum, Huon Pine, Silver Wattle, desert Cooba, Blackwood, curly and birdseye Maple, American Walnut and Crotch Walnut and even some Gidgee! A lot to choose from, I think I'll continue with the K.I.S.S. principle, Keep It Simple Stupid......... it seems to work for me!

All glued together I pre- finished the inside of the till with a few light coats of shellac to give a stable base for wax later on, to make the drawers glide in and out with ease. I intend to have a fair few tools in each drawer, so every bit of sliding assistance helps! I then grabbed my trusty wooden clamp and glued in the bottom drawer divider before the center divider was fitted. Some people ask why I bother to make these types of clamps, well the answer is in this photo. What other clamp is there that will provide good clamping pressure this far ( approx. 180mm/or over 7"s ) from an edge, with still over 25mm (1") to spare? I don't use it all the time, but it's invaluable when I do. The jaws are made of Cooba, a native Australian Acacia with beautiful figure.

Here's the till all glued up, dividers in place and ready for for finish planing, a light sand here and there and then a few coats of tung oil. Quite happy with how it looks, plane as it is. Maybe I can put a bit of colour in the drawer fronts?

Hopefully I'll get a chance to start the drawers this week, but our house goes to auction this weekend so I may get a little distracted with other things! I'll stick with poplar for the drawer sides and bottoms but don't know about the fronts. Looking through the wood rack, I've got a choice of ...... salvaged Tasmanian Myrtle, salvaged fiddleback Redgum, Huon Pine, Silver Wattle, desert Cooba, Blackwood, curly and birdseye Maple, American Walnut and Crotch Walnut and even some Gidgee! A lot to choose from, I think I'll continue with the K.I.S.S. principle, Keep It Simple Stupid......... it seems to work for me!
Saturday, 14 May 2011
Till for the tools.
Just a short update, in between other commitments,like work and trying to sell our house! More about that down the track. I decided on a shallow sliding till for the chair chest, as it would allow me to have plenty of room below for large draw knives, winding sticks and other large tools and jigs.

So here is the till milled, dovetailed and dado-ed ready for drawer dividers/runners. As per my previous post, everything to make the chest is coming straight from my wood rack and this stuff is no different. The till is American Poplar, bought when I was in Pennsylvania, after taking a chair course in Tennessee with Curtis Buchanan. I bought back a heap of American 'Lumber' as they call it, and this is a smidgeon of the poplar I bought. Ideal stuff for internal pieces, drawer sides and bottoms etc. It saws, planes and chisels well and I actually like the greenish creamy colour.
Don't know yet if I'll face the front edges or not with something a bit more exotic, but part of me is resisting as it is supposed to be a working chest after-all. Not a posers! Maybe I can build a flash one for the cabinet making tools later down the track. Hopefully I'll get a chance to glue it all together tomorrow then I can start measuring for drawers. I think I like making drawers as much as chairs...!

So here is the till milled, dovetailed and dado-ed ready for drawer dividers/runners. As per my previous post, everything to make the chest is coming straight from my wood rack and this stuff is no different. The till is American Poplar, bought when I was in Pennsylvania, after taking a chair course in Tennessee with Curtis Buchanan. I bought back a heap of American 'Lumber' as they call it, and this is a smidgeon of the poplar I bought. Ideal stuff for internal pieces, drawer sides and bottoms etc. It saws, planes and chisels well and I actually like the greenish creamy colour.
Don't know yet if I'll face the front edges or not with something a bit more exotic, but part of me is resisting as it is supposed to be a working chest after-all. Not a posers! Maybe I can build a flash one for the cabinet making tools later down the track. Hopefully I'll get a chance to glue it all together tomorrow then I can start measuring for drawers. I think I like making drawers as much as chairs...!
Monday, 9 May 2011
No rot, just what's in the shop
With the rot cut out and a suitable piece of clear Black Heart Sassafras inserted in it's place, it was time to replace the base of the chest. It came to me then, having used the piece of sassafras, an offcut from a dining table I had made. I should only use timber to restore the chest from stuff I have already in my shop. Just as our frugal wood working predecessors would have. No waste, no frills, practical and functional. Everything a 'working' chair makers chest should be.
Anyway at this point I've tried to load a pic of the chest with the new piece of wood glued in, but it seems these blog things just aren't as easy as they are cracked up to be. Cant load a pic and I've just installed an entire new browser, just so I can post this much. Anyway 'you get the picture' even if you don't!
I then raided the wood rack and picked some East Gippsland Blackwood boards I had left over from two Adirondack chairs I'd made last year. Milled and ship-lapped on the dado blade and the new floor was in. Solid and room to expand and contract with the weather.

Wow, it's working again. So here's the floor. I sat and looked at my list of tools that needed to fit and thought about the most practical way to house them. Back to the old chest to have a look. I gently removed the drawers from the sliding till and then studied it's construction. Beautifully dovetailed and with through mortise and tenons. I tried something on the spur of the moment.

Yep just as thought, the old till fitted perfectly in the 'new' chest. In fact there was only a couple of mm either side. As I mentioned before, whoever had made this chest had done so using not only hand skills but also to proven or accepted dimensions. Just the same as the most common windsor chair stretcher tenon is always most certainly 5/8ths of an inch. So that settled it for me, a smaller sliding till with spacious areas front and back in the base for larger items. And, maybe saw storage in the lid. Now, back to that wood pile......
Anyway at this point I've tried to load a pic of the chest with the new piece of wood glued in, but it seems these blog things just aren't as easy as they are cracked up to be. Cant load a pic and I've just installed an entire new browser, just so I can post this much. Anyway 'you get the picture' even if you don't!
I then raided the wood rack and picked some East Gippsland Blackwood boards I had left over from two Adirondack chairs I'd made last year. Milled and ship-lapped on the dado blade and the new floor was in. Solid and room to expand and contract with the weather.

Wow, it's working again. So here's the floor. I sat and looked at my list of tools that needed to fit and thought about the most practical way to house them. Back to the old chest to have a look. I gently removed the drawers from the sliding till and then studied it's construction. Beautifully dovetailed and with through mortise and tenons. I tried something on the spur of the moment.

Yep just as thought, the old till fitted perfectly in the 'new' chest. In fact there was only a couple of mm either side. As I mentioned before, whoever had made this chest had done so using not only hand skills but also to proven or accepted dimensions. Just the same as the most common windsor chair stretcher tenon is always most certainly 5/8ths of an inch. So that settled it for me, a smaller sliding till with spacious areas front and back in the base for larger items. And, maybe saw storage in the lid. Now, back to that wood pile......
Sunday, 8 May 2011
Organising the Chaos.
hAny body who has taken one of our Windsor Chair Classes at the Melbourne Guild Of Fine Woodworking - http://www.mgfw.com.au/ will know that I arrive with all my tools for the class in a 'Ged Clampett' mix of milk crates, drawers out of my tool cupboard and the odd card board box. Fine edged draw knives and the like just don't mix with other metal tools and running a class with 6-8 people means multiples of most tools. I had to have a better means of transporting my tools.
I have a thing for quality old tools. I have a thing for most quality things actually, but that's another story....
A few years ago I finally had the opportunity to buy a very special old tool chest. The tale of the chests life is for another time....yes, it's a long story, but I had planned at some stage to replicate it.

Fast forward a few years and it appears I'm not the only one who has a love of these great old chests. Hand tool enthusiast, writer and editor of Popular Woodworking magazine Christopher Schwarz has just released his book on the subject, The Anarchists Tool Chest ( Find it here - www.lostartpress.com/product/a1aeb796-1199-45c3-b9ca-99acd1d22b1a.aspx ). Well, the book is about so much more than the chest itself, but you get the picture.
I decided to put together a chair makers tool chest. Nothing superfluous, just hand tools for making windsor chairs.
What had started as a thought to produce a chest from scratch, changed when I found a old one on the net one evening. When I say a chest, it was a shocker, covered in paint, rotted plywood floor and lid and the rot was creeping into the carcass. The price was right though, $40.
But there was something about it. For a start the all sides were single boards and the corners had hand cut dovetails. Marking gauge lines still visible.

So the paints been stripped, rotted ply gone, later addition brass corners and handles removed. Now just to cut out the rot you can see in the bottom edge, centre and replace the timber. Then comes a new solid wood floor, and mapping out where and how I can fit a chair class worth of tools into this old chest.
After removing all the rubbish, the chest is starting to reveal a little more of it's original persona. More about that soon.
I have a thing for quality old tools. I have a thing for most quality things actually, but that's another story....
A few years ago I finally had the opportunity to buy a very special old tool chest. The tale of the chests life is for another time....yes, it's a long story, but I had planned at some stage to replicate it.

Fast forward a few years and it appears I'm not the only one who has a love of these great old chests. Hand tool enthusiast, writer and editor of Popular Woodworking magazine Christopher Schwarz has just released his book on the subject, The Anarchists Tool Chest ( Find it here - www.lostartpress.com/product/a1aeb796-1199-45c3-b9ca-99acd1d22b1a.aspx ). Well, the book is about so much more than the chest itself, but you get the picture.
I decided to put together a chair makers tool chest. Nothing superfluous, just hand tools for making windsor chairs.
What had started as a thought to produce a chest from scratch, changed when I found a old one on the net one evening. When I say a chest, it was a shocker, covered in paint, rotted plywood floor and lid and the rot was creeping into the carcass. The price was right though, $40.
But there was something about it. For a start the all sides were single boards and the corners had hand cut dovetails. Marking gauge lines still visible.

So the paints been stripped, rotted ply gone, later addition brass corners and handles removed. Now just to cut out the rot you can see in the bottom edge, centre and replace the timber. Then comes a new solid wood floor, and mapping out where and how I can fit a chair class worth of tools into this old chest.
After removing all the rubbish, the chest is starting to reveal a little more of it's original persona. More about that soon.
Saturday, 7 May 2011
So what's it all about?
So if you have found your way here, your probably wondering where I'm going with this and why I am posting information in the first place?
Well the short answer is because there have been a lot of people nudging me for too long to start posting this information in a place where it can be accessible to a greater audience than the fellow wood workers and furniture makers I spend time with.
Then of course is the bleedin' obvious, which is that I love a good story and could talk under wet cement eating ice cream and I love working with wood, so what better forum to do it in? Right?
I'll try my hardest not to bore you all with long winded stories and keep my blurbs as short as possible, but I'm no copy writer or editor so you'll have to excuse my poor grammar and lack of computer savvy-ness!
The first real interesting thing I want to share is my latest project, in fact it was talking to a few mates recently about it and seeing their enthusiasm for it that finally convinced me to get off my proverbial and get this site going...
Now to work out how to load photos onto this 'ere thing....

Well the short answer is because there have been a lot of people nudging me for too long to start posting this information in a place where it can be accessible to a greater audience than the fellow wood workers and furniture makers I spend time with.
Then of course is the bleedin' obvious, which is that I love a good story and could talk under wet cement eating ice cream and I love working with wood, so what better forum to do it in? Right?
I'll try my hardest not to bore you all with long winded stories and keep my blurbs as short as possible, but I'm no copy writer or editor so you'll have to excuse my poor grammar and lack of computer savvy-ness!
The first real interesting thing I want to share is my latest project, in fact it was talking to a few mates recently about it and seeing their enthusiasm for it that finally convinced me to get off my proverbial and get this site going...
Now to work out how to load photos onto this 'ere thing....

Hello and Welcome
Hi my name is Glen Rundell. To those of you who don't know me I'm a woodworker who has come to the craft later than some but with a continuous desire to improve my skills and create beautiful, functional and quality chairs, furniture, tools and wooden items.
I guess I have always drawn, built or made things, whether it was from wood, steel or leather or just sketched, from my earliest days as a kid. Joining, welding or stitching these things together was exciting and seeing the finished item gave me an immense sense of achievement that I still get today when I see a finished piece.
Anyhow, the purpose of this blog is to document my woodworking journey, share woodworking information freely as it should be shared, encourage the use of traditional hand tools and hand skills and encourage others to be passionate about their craft. I hope you enjoy the journey. Glen
I guess I have always drawn, built or made things, whether it was from wood, steel or leather or just sketched, from my earliest days as a kid. Joining, welding or stitching these things together was exciting and seeing the finished item gave me an immense sense of achievement that I still get today when I see a finished piece.
Anyhow, the purpose of this blog is to document my woodworking journey, share woodworking information freely as it should be shared, encourage the use of traditional hand tools and hand skills and encourage others to be passionate about their craft. I hope you enjoy the journey. Glen
Subscribe to:
Posts (Atom)